
pickles
June 23, 2013 § Leave a comment

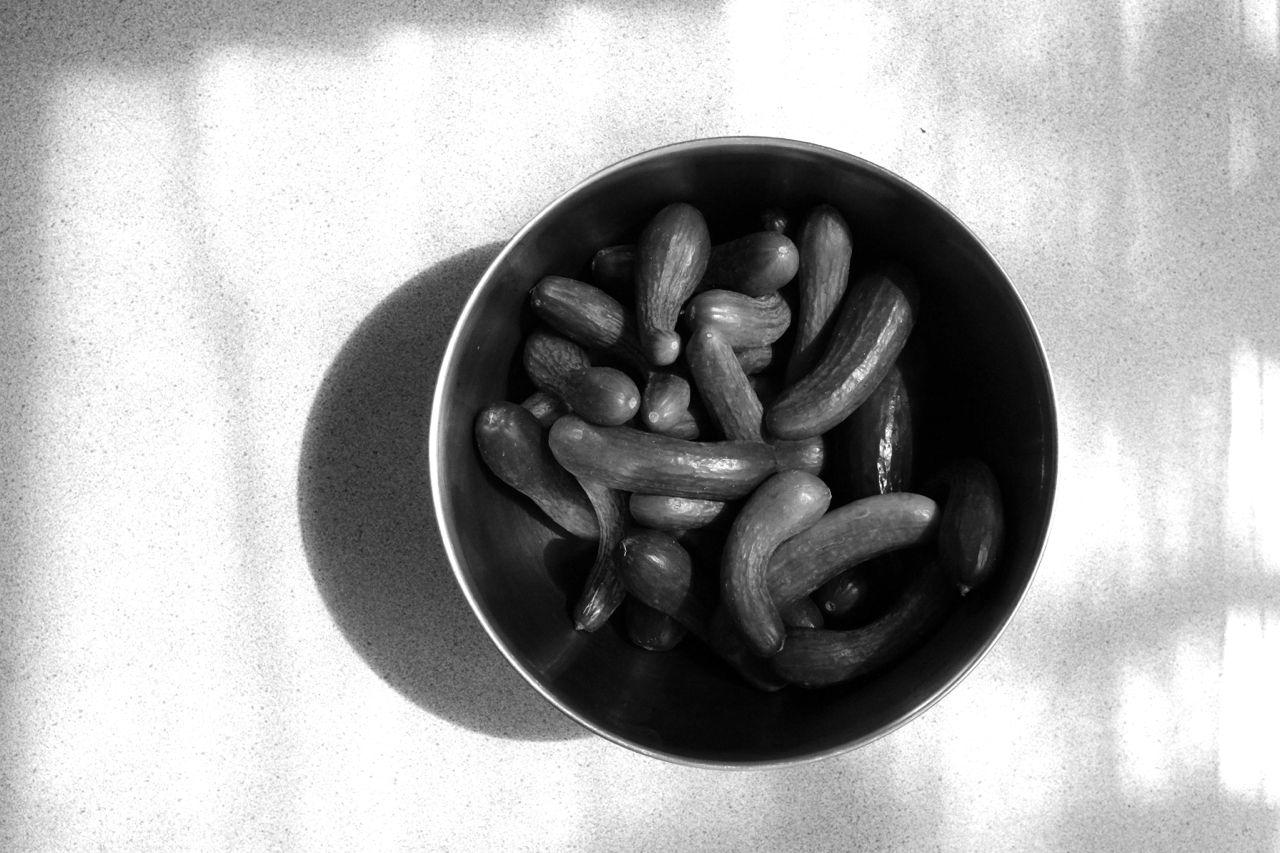
Without meaning to belabour the point, winter is an exciting time in the top end. Really it is like summer down south and the vegies that grow this time of year are proof of that. We have four cucumber plants in pots under the verandah in anticipation that they will provide some edible shade in the coming months. But in the meantime, I have been getting them from the markets, small and sweet, straight from the local growers at Humpty Doo.
And I know I have mentioned this to you before, but I do love pickles. Crunchy, tart, sour, salty. In true wholesome, traditional and healthy fashion, I have provided you with an old recipe for making pickles, one that uses ancient methods of fermentation and preservation. This way you get all those wonderful lactobacillus which I have been told, on countless occasions by my mother, – are very very good for you. And mothers are always right.
If you want a recipe for pickles that tastes like those you buy in the shops you will need to look elsewhere. Inspired by Jenny at Nourished Kitchen, this recipe uses salt rather than vinegar and as a result, the lacto fermentation process. But still, below I have given you two options for making brine. The first is exclusively with salt and the second is with less salt and a small amount of apple cider vinegar. You can decide which version you like the best.
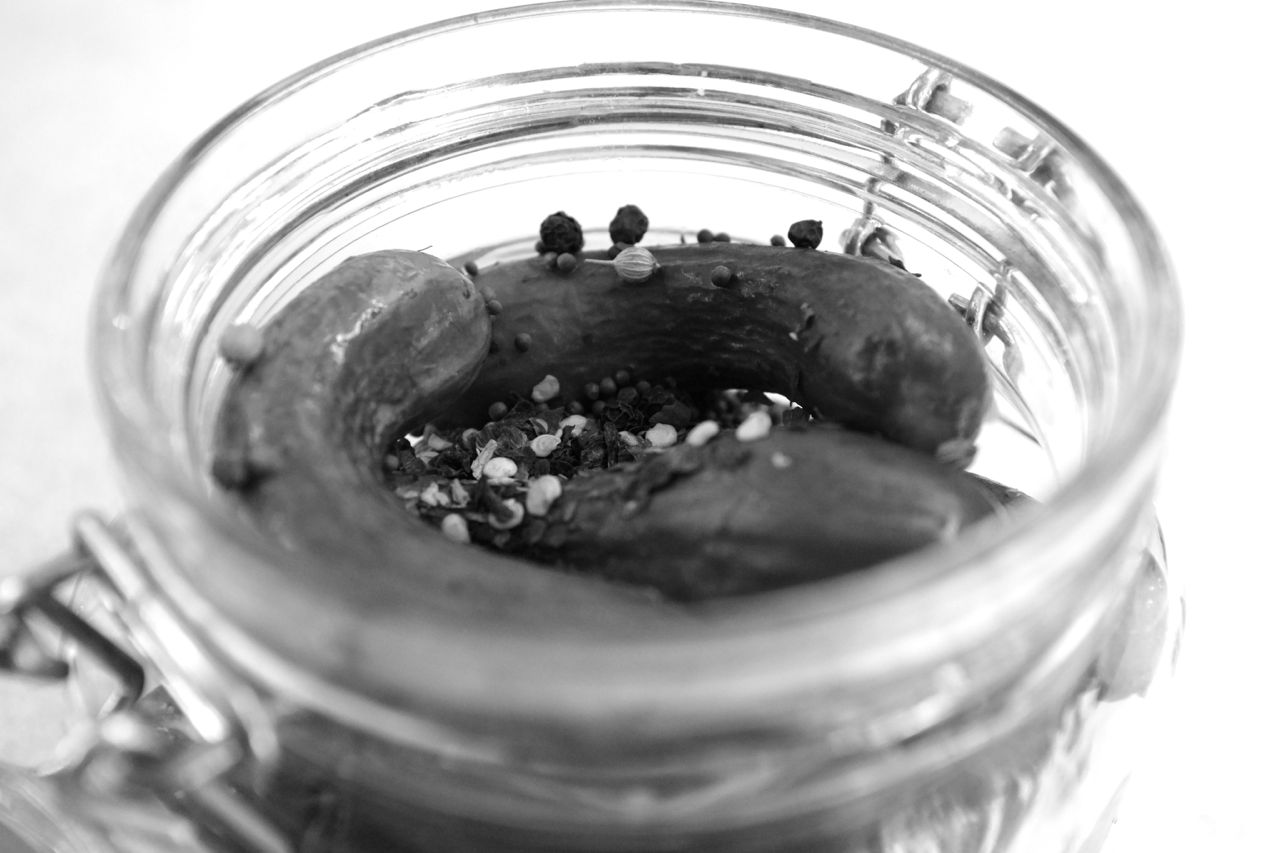
Lacto fermented pickled cucumbers
For pickling, try to use freshly picked cucumbers if possible, but if not, get ones that are organic and as fresh and small as you can find. Say no more than 2 inches long.
Ingredients
Enough pickling cucumbers to fill your jar(s).
4 cloves of fresh organic garlic – per 500ml jar
1 tsp spices (for example, allspice, mustard seeds, bay leaf, black pepper, dried chilli flakes etc) – per 500ml jar
Optional – Use 1 fresh grape-vine leaf with the stem removed or a horseradish leaf per 500ml jar. This will help your pickles to stay crisp when the lactic acid fermentation is complete.
Brine
Option 1: 2 ½ – 3 tablespoons of salt per 4 cups of chlorine free filtered water
Option 2: 1 tablespoon of salt and 2 tablespoons apple cider vinegar for every 3 cups of chlorine free filtered water.
(1 cup of brine usually fills a 500ml jar)
Method
If you were unable to pick your cucumbers fresh, the first thing you will need to do is soak them in very cold icy water to perk them up before they ferment. Next, you’ll want to make sure all stems and flowery ends have been removed as they may give an off-flavor to the pickles. I generally cut a tiny scrape off the ends of each cucumber with a knife to be certain. It is also important that each cucumber is cleaned carefully. These steps will help ensure your pickles remain crunchy.
Place the pickling cucumbers, garlic and spices in sterilised jars in layers and ensure that they are a snug fit but without damaging the cucumbers. Add the horseradish or grape-vine leaf if you have it.
Prepare your brine. Shake or stir to help the salt fully dissolve. Pour the brine over the pickling cucumbers, until all of the ingredients are submerged. It is important that all of the ingredients are covered with the brine, and if necessary add a clean weight into the jar to help push them under the liquid, for example, a small plastic lid. Secure the lid and allow to ferment at room temperature for between 5 and 10 days, depending on your climate. The cooler it is the longer it will take. Once they are ready, store in the fridge to be eaten as you please.
As a side, I know it can be a fear with people, as it was with me, to be uncertain about whether your ferments are off. All I can say is, trust me, you will know. The smell is bad enough that you won’t want to touch them.
the story of how I learnt to make yoghurt
May 18, 2013 § 3 Comments
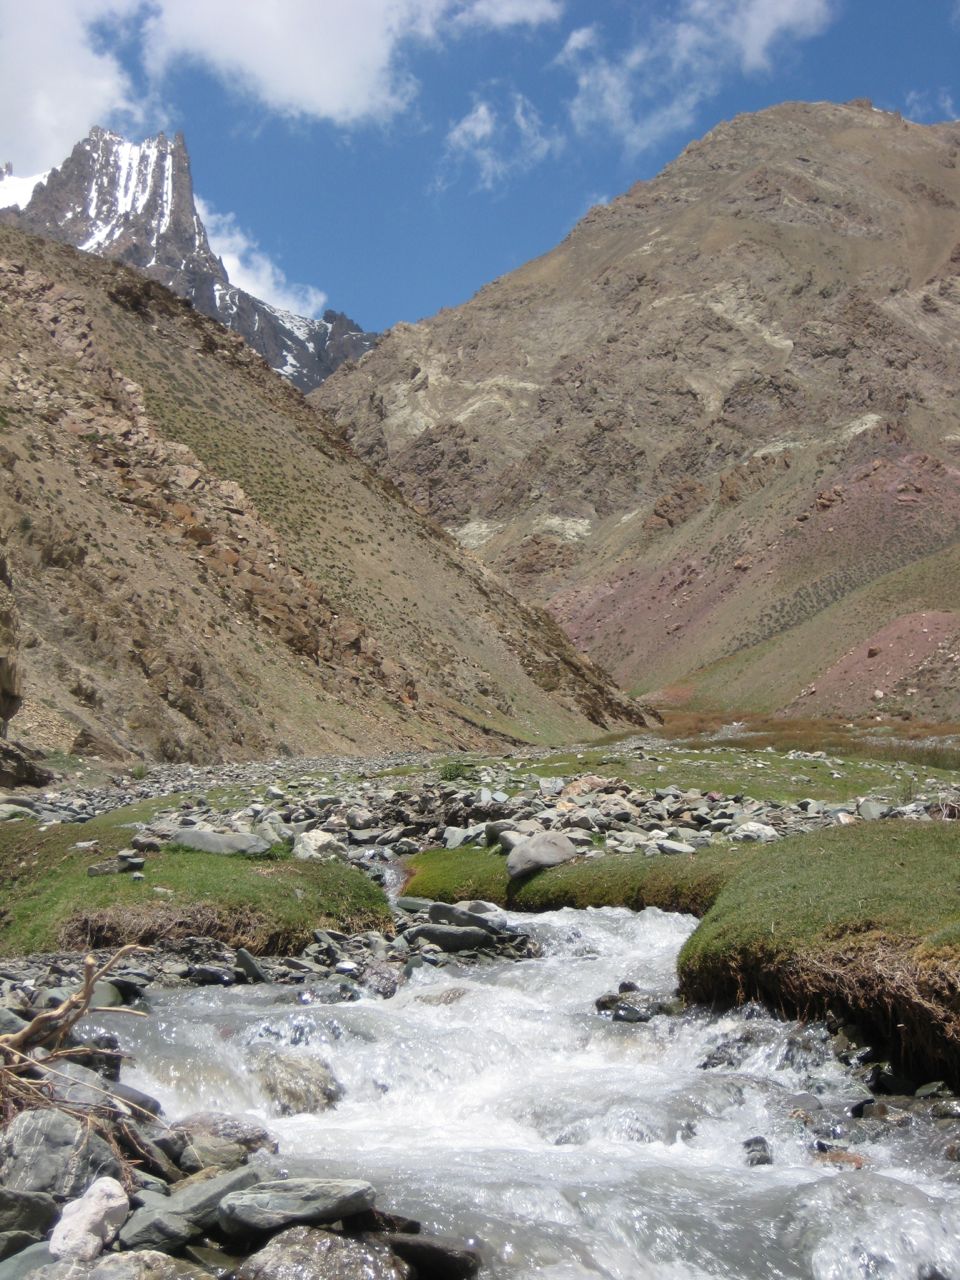
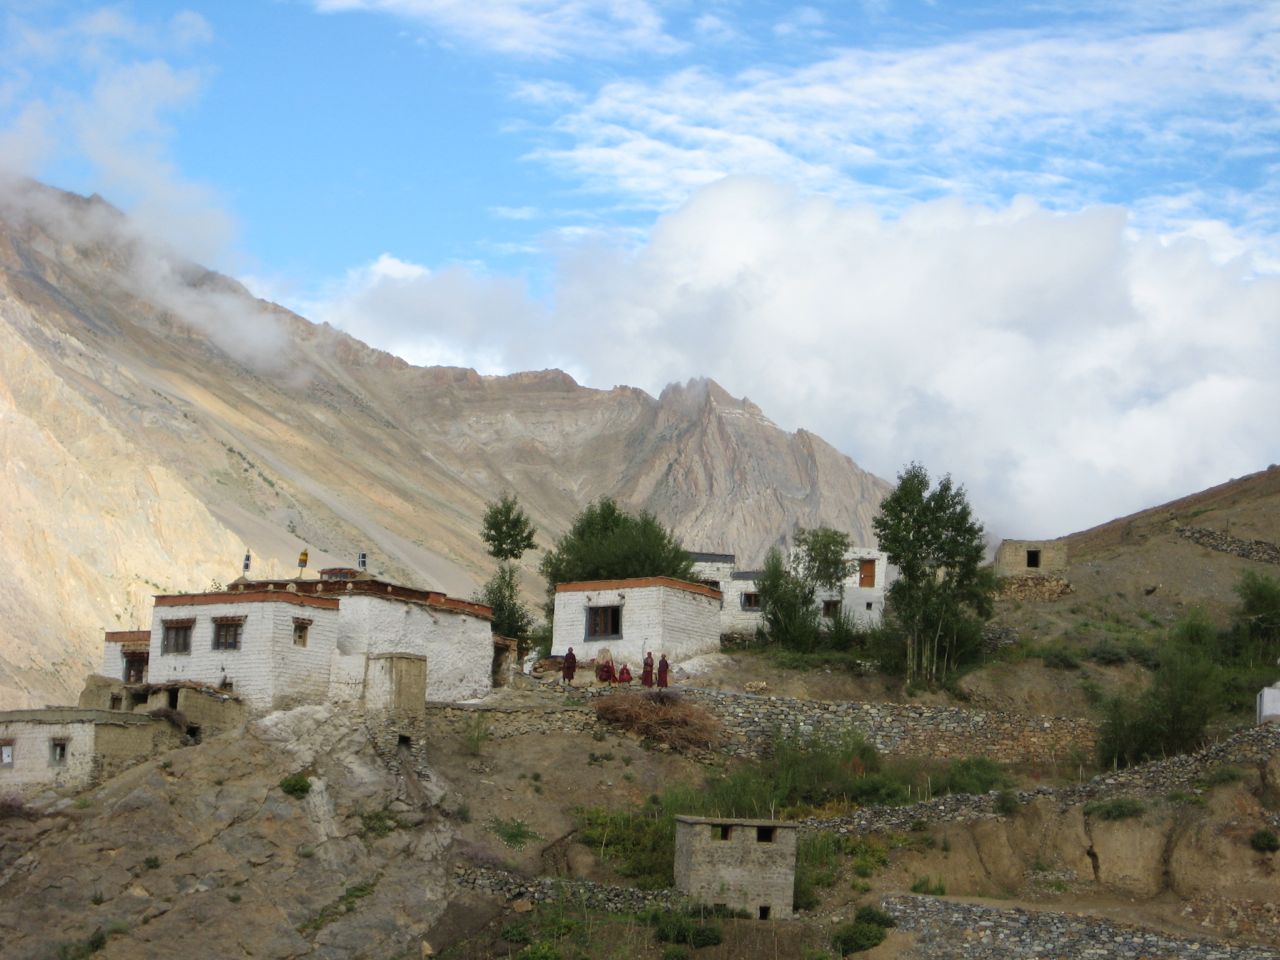
The story of how I learnt to make yoghurt is not a simple one. It spans some 5 years and two continents. It begins just after I finished my undergraduate degree, when I spent a year in India, getting lost and trying to find myself again. As you do when you are 24. During that time, I spent a couple of months volunteering in a Buddhist nunnery teaching English in the Gompa. The nunnery was in the far north of India, in a place called Zanskar, a mountain range that runs on the Tibetan side of the Himalayas. Being in the rain-shadow of the tallest mountain range in the world, Zanskar is something like a desert, it never rains and vegetation on the surrounding slopes is scarce. But in the valleys where there are glacial streams, fluorescent green fields make a stark contrast to the moonscape hills. Here the grass grows with a certain urgency learnt through evolution in a land where warmth and water are ungenerous.
But signs of life are not restricted to the stream soaked valleys. On the hill tops prayer flags beat in the winds, some are very old, worn and tattered with almost all their prayers lifted to the breeze. Fossils scatter the myriad of paths that weave their way out of town along scree slopes and over mountain ridges. These benthic remnants a reminder that this very landscape was once hundreds of meters below the ocean.

My journey to Zanskar begins in Leh, with a 26 hour bus ride covering some 400km to take me to the remote valley. As you can imagine, the road is very rough. Because I booked late, I don’t have a seat and so have to make do with the floor where I wedge my way into a somewhat comfortable space between the luggage that fills the aisle. I am not the only one and soon a man falls asleep on my back and another on my knees. After 10 hours of this and with the knowledge of 16 more to go, I begin to feel agitated, my legs and back cramped. From my place on the floor I glance up at a boy standing at the front of the bus without even room to sit. He is smiling and in his smile my anger subsides. The easy nature of the locals and their open acceptance of each situation is contagious. Like other times when I have traveled to developing countries, I am struck by what lessons we have forgotten in a privileged and wealthy world. Not long after, a girl sitting on the seat next to me offers me her lap to rest my head. Gratefully I fall asleep there for an hour or two. Later I find out she is from Zangla, the small village where I will be teaching.
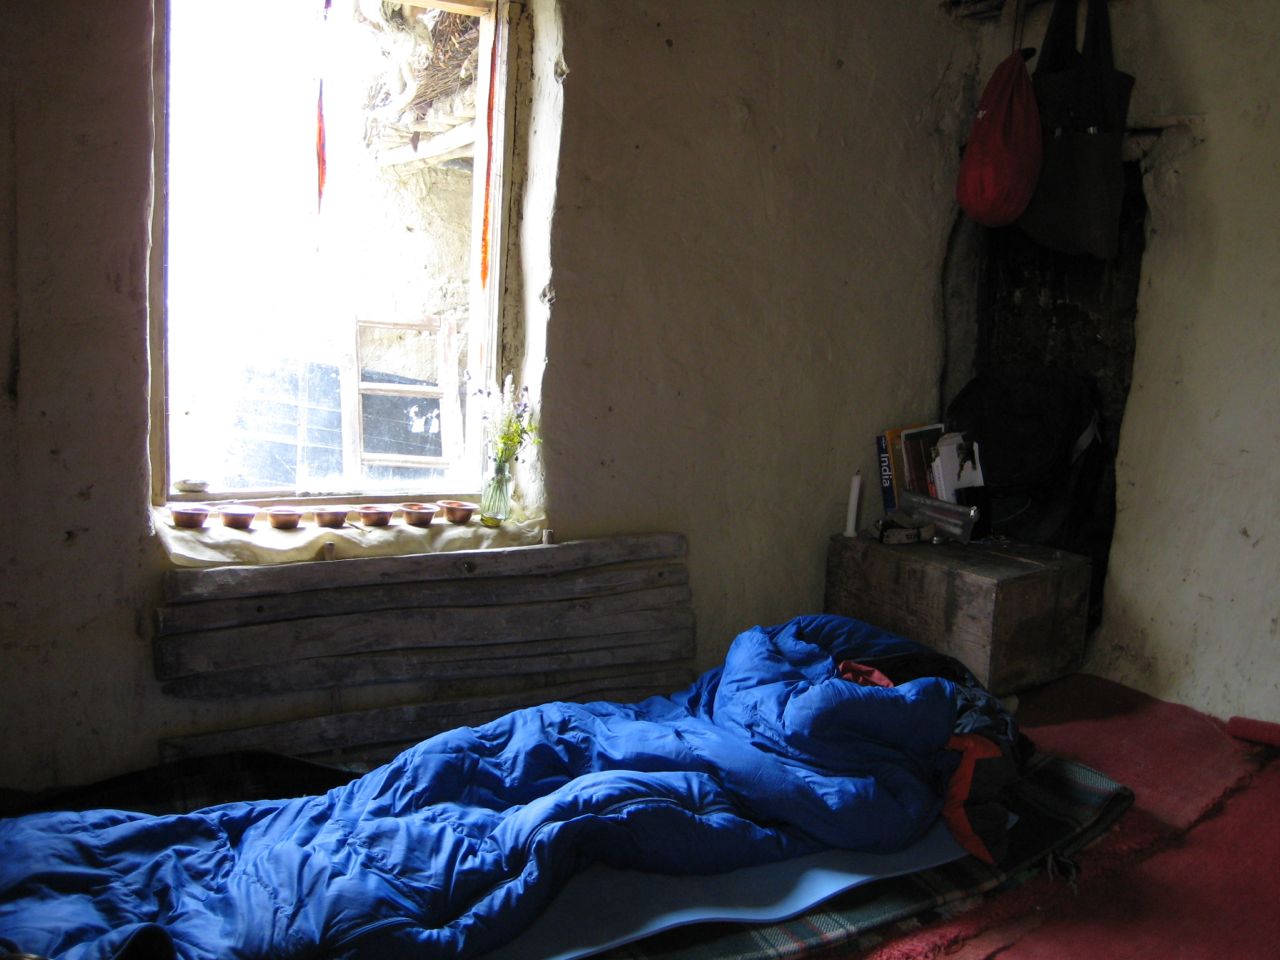
When we finally arrive, tired and dirty from the dusty road, it is late, so I spend the night with the girl from the bus in her family home. Their house is like all the rest in the village, made from mud and cow dung, two stories high, with a flat roof loaded with fodder, wood and dried cow dung to burn in the coming winter.

The next morning I walk through a flowered field woven with a myriad of creeks and streams running to the river. There I wash in water clear as glass before walking the short distance to the Gompa that sits on a small hill on the far side of the village. I am nervous to meet the nuns as they have no way of knowing I am coming, but I am greeted with warm smiles and open laughter.
During my time at the monastery, my relationship with the nuns becomes more like a friend than a teacher and maybe this is why at times it is difficult to get them to come to class. Many of the nuns don’t have much of an interest in learning English, except maybe male and female body parts for which they have abundant enthusiasm. But it makes me question what I am doing. What is the purpose of teaching English? Is it not just another form of cultural imperialism? I still don’t really know the answer to this, but I do know that I am there with others who came before and after me. With a growing number of tourists visiting the region each year and with increasing access to the outside world, western influences are unavoidable. And in general, such change is welcomed by the locals, because with it comes a higher standard of living, the ability to join the rest of the world, to “develop”, to “progress”. I realise I am more sentimental than many of the locals in regard to the loss of traditions and the damage to land and culture that comes with such pursuits. But as I learn from the Buddhists that live there, nothing is permanent, change for good or for bad is inevitable. So perhaps as westerners we should focus on learning from our own mistakes and try to assist those who are following in our footsteps to take on a more sustainable path. Because of this I allow myself some small reassurance that in some tiny way, I am giving the nuns some of the skills they need to communicate with the outside world, so they can speak up and voice their needs and concerns in a shifting landscape. But it is small comfort in light of the stories of rapidly retreating glaciers, water sources drying up, the brain drain as educated children chose to live in far off cities, the introduction of white flour, sugar, packaged food and the plastic litter building up in a place with no formal rubbish disposal system.


So I spend my time practicing the art of just being and trying to help where I can, teaching in the school with the younger nuns, offering small informal English lessons here and there and lending a hand with the cooking.
The kitchen is a good place to be because it is where the nuns meet. Warm and cheeky they laugh and hoot slapping one another on the legs as they sit cross-legged at the low tables lining one wall of the large room. This is where I watch them making yoghurt. Taken fresh, straight from Pashi the Gompa’s resident cow, they heat the milk over a large pot-bellied stove in the middle of the room. Just as the milk starts to simmer but before it boils they pull it off the heat allowing it to cool to the temperature of a hot bath before stirring in a tablespoon or so of yoghurt left over from the last batch. The whole pot is then wrapped in a thick woollen blanket and placed in a corner of the kitchen until the next day when it is eaten with ladakhi bread and butter tea for breakfast.
I become very fond of Pashi and her calf Patel. They are a handsome pair, golden blond with strongly defined features. Their stable is next to my room and at night I can hear them moving around. They give me great comfort. In the evenings I bring Pashi back from the fields where she is tethered on a grassy knoll. The pleasure in the simplicity of it all, walking the cow home with the summer breeze on my face and playing in my skirt.
My room is also made of mud and cow dung, a little square that I can just lie down in. It has a small window and a small door I have to double over in to enter. When it is windy the roof sprinkles dirt to the floor. The scene from my window is vivid. At dusk small birds with round bellies and orange tails sit outside and I try to be very quiet then, any movement and they will fly away. As night draws, the moon illuminates the land with a pale yellow grey light and the shadows of the clouds play on the mountain tops.
Some days I walk to the river, its fast current tempting me, full of the energy of the mountains and sky from which it came. To get there I walk past Mane walls, ancient inscriptions on flat stones piled together. Who placed those first rocks there sending Om Mane Padme Hum to all ends of the earth? The valley big and broad with barely any landmarks, I lose perspective of distance, everything seems closer than it really is. Zhos (a cross between a yak and a cow) graze on the fertile strips where a creek meets the river’s edge. I watch the herders bring them together and drive them home. At the river the current is hypnotising, eddies run in all directions and waves appear to move upstream.


Other days I follow the small stream up behind the Gompa into a canyon that becomes narrower and narrower drawing nearer to its source. There in the rock pools I swim comfortably naked and alone among the pastel green, maroon, and orange of the boulders. The water as glass, streams crystal clear over the rocks, like cloth falling over the landscape, cool enough to make me gasp but warm enough to linger a while.
One night stands out to me in particular. It is nearing the end of my time in Zanskar when we can’t find Pashi. She is not in the field where we left her and must have broken her tether. One of the nuns and I go looking for her down by the river. The moon is half full in the sky and bright enough to lead the way, the stars half obscured by clouds. The green field in the flat of the river runs with small streams and shines moist. The beauty catches my breath. We spend two hours wandering along the water’s edge, through fields and along stone-walled pastures. Finally, defeated, we walk back to the village through the sweet smell of mustard in flower. Back at the Gompa we find Pashi tethered to her stable. One of the other nuns found her and brought her back whilst we were gone. By now it is late and I climb back into my mouse-hole room only to find I cannot sleep. The freshness of the night still on my skin and in my mind, the stars shining on me.
My last day in Zangla, I wake up from my small window to see the sun’s first rays on the fresh snow-capped mountains turning from grey to orange to yellow and finally to white as the day begins. My sleeping bag is slightly wet from rare rain that fell that night. After breakfast the nuns fill my bag with chapatis’ for my journey to Leh. Way to many for me to eat by myself but they insisted I take them all. We hear the bus coming so running out the door, kataks thick around my neck it finally dawns that I am leaving and tears prick my cheeks. I climb onto the roof of the bus. From there the nuns look so sweet waving in their maroon robes framed by the Gompa and the Himalayas. The fresh morning and the smiling mountains feel good on my damp cheeks. I am full with the privilege to have lived a little in their world.
How to make Yoghurt
Before going to Zanskar, I had always been put off by the idea of making yoghurt as every recipe I had come across called for either a yoghurt-maker or thermometer, making it all seem far to complicated. But after seeing the nuns do it, I realised all you really needed was a large pot, a warm place, a blanket and a bit of careful watching.
But still I kept putting it off and it wasn’t until a year ago when I was asked to give a fermentation workshop at CERES that I decided I better give it a go. I couldn’t even pretend to be an expert if I had never made yoghurt before. So I started researching. It turned out I didn’t need to go far. In my bookshelf was my much-loved copy of Wild Fermentation and in it a recipe for Yoghurt that doesn’t use a yoghurt maker or a thermometer. This was what I’d been waiting for.
The most important thing you need when making yoghurt is a warm and cosy place to rest it in. I usually pre-heat a small Esky by filling it up with hot water from the tap. I then empty it, dry it out and fill it with towels and if it is winter and really cold, a hot water bottle or some jars filled with warm water as well. But really what you need is a place that will cool down very slowly. I have also heard of people making yoghurt in a thermos and I’m sure this could work too.
Yoghurt Recipe makes 1 litre
Equipment
1 litre jar
Insulated cooler/esky
Ingredients
1 litre whole organic milk
1 Tbsp fresh yoghurt (check it has live cultures)
Method
Pre – heat your jar and cooler with hot water, so that they won’t drain heat once you pour in your yoghurt.
Slowly heat your milk, paying close attention, until tiny bubbles start to form but before it starts to boil (if you have a thermometer, this is 80°C/180°F). Stir frequently to avoid burning the milk. The heating is not absolutely necessary, but it helps to get thicker yoghurt.
Allow the milk to cool until it still feels hot but is not so hot that you can’t keep a clean finger in it. You can quicken the cooling process by placing your saucepan in a bowl of cold water. But be careful it doesn’t cool too much. The optimum temperature is as mentioned above – about 40°C/110°F).
Mix the starter yoghurt into the milk. Make sure you don’t get tempted to add more yoghurt thinking it will help to make a thicker end result as it will do the opposite. Poor into your jar, screw on the lid and place in your pre heated “incubator”. If you see fit, add some jars with warm water and/or a hot water bottle (with warm water in it) to help maintain the temperature. Leave in a place where it won’t be disturbed as it doesn’t like being jostled.
After 8 – 12 hours, check on your yoghurt. It should have developed a “tangy flavour and some thickness” .
Store in the fridge and consume within 4 weeks, saving some for your next batch.
Finally, make sure you have a look at how to make Labnah cheese from yoghurt here and some of the things you can do with Labnah here.
kimchi
September 30, 2012 § 2 Comments
Here is a vegetarian version of kimchi, a korean type of sauerkraut. I have had a craving for this for a while now, so yesterday I headed on down to the CERES market to pick up the ingredients .

What you will need
6 cups shredded cabbage
2 cups grated carrot
2 cups grated daikon radish
1 Tbsp grated ginger
2 cloves crushed garlic
1/2 – 1 tsp chilli flakes or chilli paste
1 Tbsp Salt
4 Tbsp Tbsp whey (or alternatively use an extra 1 Tbsp salt)

Place all ingredients in a very large ceramic or glass bowl. Pound with a heavy spoon, potato masher, or a meat hammer to release the juices. Sterilise, a wide mouthed 2 liter jar. Place the pounded ingredients inside the jar and push down firmly so there is a layer of juices above the vegetables. There should be at least 1 inch between the top of the jar and the vegetables. Cover tightly and leave at room temperature for 3 days before transferring to the fridge. You can eat straight away, however it will improve after another week or so.

wild sourdough bread
November 3, 2011 § 3 Comments

I had a sourdough starter given to me from a friend who had been given it from someone else who had inherited it from his mother. The original was rumored to be 30 years old or so the story goes, and no wonder it made such lovely bread. It wasn’t my first, I had inherited others and made some myself but I was never devoted enough to go the distance as travels would take me here and there and houses were often new. Needless to say, a lot of them got lost or perished along the way. But during their various lives spent with me, they all became well-loved members of the family.
Even though my descendent of the 30 year old starter had not been in my life more than four months it was no exception, it had worn a comfortable place in my heart. But one day it mysteriously disappeared, the little jar where it sat dormant in the fridge was gone without a trace. My reaction was one of somewhat panic. The mysteriousness made it all the more tormenting. I felt I had lost a wise old friend.
After some lonely days left yearning for some dough to stir and knead and bake and smell, I pulled myself together to start again, from scratch, to see what kind of a beast this spring Melbourne air would bring to a culture. Also, I have been wanting to post a recipe on sourdough for sometime now but never knew quite where to start… I guess at the very beginning is best.

Sourdough is pretty much a way of making bread without conventional yeast, instead you use natural yeasts harnessed from the air. And thats what is so very wonderful about it, every culture is unique taking the native variety that comes with the location.
How to make sourdough bread
The starter

Place 1 cup flour (I like using spelt or rye, but any wholemeal flour will do) and 1 cup water in a large wide-mouthed jar, stir well and let it sit, covered with a muslin cloth, for about 4-6 days or until it starts to bubble. During this time you must stir it at least once a day, twice is better – once in the morning and once in the evening. When it bubbles and starts to rise in the jar you should notice it has a nice sour smell. You can now add 1 tablespoon of flour every day for 3 or 4 days and continue stirring as before. It should get more bubbly and be doubling in size between feeds. Now you know it is ready and you can either feed it one last time and store in the fridge with a muslin cloth covering the jar or begin making your bread.
When storing the starter in the fridge it is best to feed it about 2 – 3 Tbsp of flour and a dash of water twice a week, it should remain the consistency of a thick paste or very wet dough. It will last in the fridge for about 3 weeks without being fed but might need a bit of extra feeding and stirring to get it happily bubbly again. You will get a feel for it as you go along.

The bread
The foundation for this recipe comes from another old friend Jenny, who gave me my very first sourdough culture about 5 years ago.
First you will need to empty the sourdough starter into a large bowl. Here its best to use a porcelain non reactive bowl. Stir in 1 cup water and 1 cup flour (again I like to use spelt or rye, but you can use any flour, or any combination of flours). Return half the mixture back into your jar, cover with your muslin cloth and return to the fridge for next time. Let what is left in the bowl sit for 6 – 12 hours. I usually cover it with a plate to prevent anything falling in.
When it is active and bubbly again, add another cup flour and water, mixing well. Allow to rest for another 6 – 12 hours (the colder the weather the longer it will need). Once active for a final time, its ready to make your bread!! (note if you used a starter that had been left in the fridge unfed for more than a week it might need one more feed at this stage to get it really bubbly and happy again). You should now have roughly 2 cups of mixture.
The final stage
To your mixture add, 1 cup water, ~ 3 – 3 1/2 cups flour and 1 tsp salt. Stir until combined. Then knead for 10 minutes adding more flour as needed.
Richard Bertinet has a wonderful technique for kneading, really just the French way, but he is where I discovered it. I found a rather unglamorous you-tube demonstration here. You will need a slightly wetter dough than my recipe, so add less flour. Also, I have never had success with this kneading method when I have used rye. A combination of spelt and wheat or all wheat seems to work best. I think high gluten is important here. You will end up with a more chewy result with this technique but its a bit more tricky so it might be best to master the basic sourdough before moving into complicating ways of kneading.
Once kneaded into a smooth dough, place into a greased and lightly floured bread tin and allow to rise covered with a damp cloth or plastic bag, until it doubles in size. This is usually between 6 and 12 hours depending on the temperature. Hot weather will make it rise a lot faster. You also have to be careful you don’t let it over rise as you will notice it starts sinking again.
Finally, bake in a pre-heated oven at 200°C/390°F for about 45 minutes or until it sounds hollow when tapped.
For example
Fri AM – Feed and split
Fri PM – Feed
Sat AM – Knead and put in tin
Sat PM – Bake

For further reading on sourdough see Sally Fallon’s Nourishing Traditions and Sandor Ellix Katz Wild Fermentation
sauerkraut
July 29, 2011 § 1 Comment

The fermentation of cabbage is a very ancient chinese tradition that is believed to have come to Europe with the nomadic Tartars. So whilst we usually associate Sauerkraut with Germany, it is really only the name that bares its origin there. The French on the other hand call it ‘choukrout’.
Interestingly the fermentation of sauerkraut takes place with 3 different microorganisms in different successional stages of the process determined by increasing acidity. However when making sauerkraut you don’t have to worry about this, the microorganisms will take care of themselves wonderfully. What you will have to do is very very simple.
I find it so satisfying and a little bit magical harnessing the bacteria from the air to transform food. As you will probably come to know, fermentation is one of my most favourite things. On this matter, sauerkraut is a very good place to start, as it is really very very easy.

This recipe comes from Sally Fallon’s book Nourishing Traditions.
1 medium organic cabbage, cored and shredded (use half red and half green and end up with a beautiful pink sauerkraut)
1 Tbsp sea salt
4 Tbsp whey (alternatively use an additional 1 Tbsp salt)
Shred the cabbage and combine in a bowl with the salt and whey.

Pound with a wooden pounder, or anything similar you can get your hands on. I usually use a metal potato masher. Keep this up for about ten minutes to release the juices.
Place in a large wide mouthed and steralised glass jar. Press down firmly with pounder or potato masher until the juices rise above the cabbage. The top of the cabbage should be at least 1 inch bellow the jars mouth. Cover tightly and leave at room temperature for approximately 3 days before transferring to the fridge. It is then ready to but will improve with age.

Preserving Olives
June 13, 2011 § 11 Comments

We live in one of the old Greek and Italian neighbourhoods of Melbourne. One of those suburbs that every now and again sport concrete lawns dotted with olive and lemon trees. A very particular aesthetic that I myself am not particularly partial to but nevertheless, I appreciate the mini suburban farms even though embedded in a cement landscape of which I can only imagine is a good way of keeping out the weeds. I am lucky enough to enjoy the advice of an old greek man who sometimes happens by when I’m in the front yard. He leans over the fence, a subtle aroma of cigarettes, commenting on the progress of our orange tree and the vegies in the garden. I enjoy the aged and wisened advice, it is the stuff I cherish most.
So it is at this time of year that trees are heavy with black fruit and the markets and grocers are brimming with plump and round olives.


I have never pickled olives before, and from a little research, have learned there is more than one way of going about it. Jim Massoto gives a wonderful step by step set of instructions and advice which you can find here. However his process takes 20 days in which you soak the olives in briny water that you change every day.
We decided, to go for a rather simpler option that a friend let us in on after he was given the advice from an olive seller at Preston Markets. With this method you may end up with olives that are slightly more bitter, but after tasting our friends and considering this process was much nicer on the environment as less salt would be poured down the drains, we were convinced. Also, it’s no where near as much hassle.
How to preserve olives
First, you want to make sure you pickle your olives when they are as fresh as you can get them as they are quick to spoil. Pick out any bruised or spoiled olives as they have an off flavour.
Sterilize a bunch of big jars. Wash the olives thoroughly and place in the jars. Cover with briny water (100 g salt dissolved per 1 litre water). Then pour a layer of olive oil on the top of the water and seal tightly. The fuller the better, as the less air inside the jar, the less likely they will contaminate. Leave in a dark cool place for about 3 – 4 months or until they develop a rich olive flavour. A layer of scum will develop at the top of the jar, however this is said to be helpful in taking away the bitterness of the olives.


And we wait, fingers crossed.
the first of kale
May 30, 2011 § 3 Comments
 Kale is in season!
Arriving in our bountiful vegie boxes fresh from Ceres Fair Food it brings a smile to my heart. There is something comforting about the grandma skin like leaves, green and dusty grey, krinkled like a well worn landscape. Its tough and rubbery exterior is deceiving. When cooked its facade melts as it turns deep green, softly crunchy and tangy.
Here is how I ate my first winter kale.

To start with, I took some labna, which you can make by following the recipe in my last post, and rolled it into balls.
I mixed together some paprika, rosemary, salt and garlic.

I added olive oil and dipped each ball.

I washed the kale, removed the stalks and chopped it roughly.

I placed the kale in a fry pan with more garlic, some butter and a little olive oil and cooked it until just wilted.
Then I popped it on some crusty toasted bread along with the labna.

And I ate it all up.

It was delicious.
