
autumn fruit
March 29, 2019 § Leave a comment
With this beautiful change of season here is a simple little recipe. Dried Persimmons filled with the nostalgia of an autumn day holding all the summer in that beautiful colour. They are a delight to pick and peel and then watch as they turn a deep brown drying in the winter sun. And its so simple. Only a little preparation and then a little waiting is required. My friend John C showed me how to do it a year ago now, and I have been waiting for the right time to share the recipe here with you.
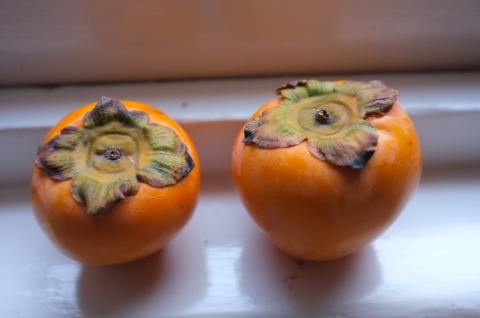
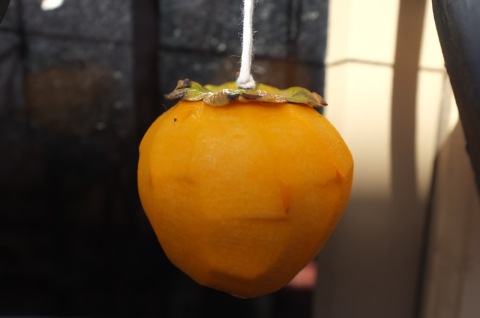
To do this, you will need a whole bunch of persimmons that are nice and golden but also still hard. You have to catch them before they go soft. This is really important.
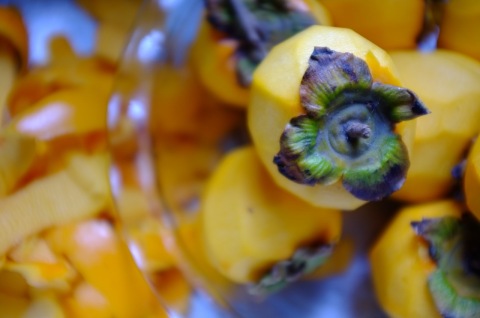
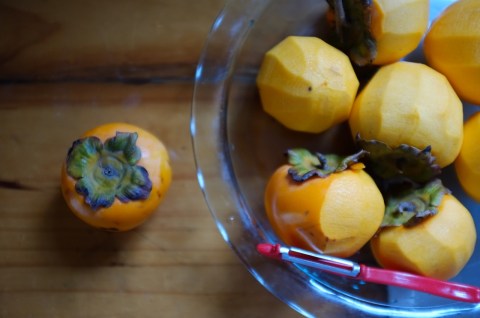
Then you simply peel, leaving the leaves and stalk. These become very useful when you are ready to tie them up and hang them in a sunny place to dry.
Then, take some string. Tie the string around the stalk or around and under the leaves.
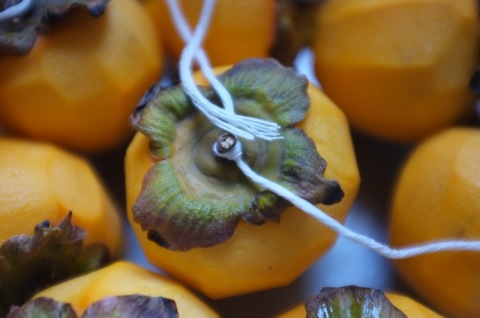
Find a sunny window to hang them in for about 2 – 3 months.
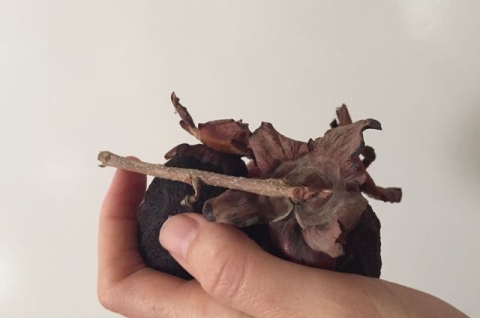
When they’re ready they will turn a beautiful deep rich brownie red.
They are delicious sliced up thinly and eaten with cheese and crackers, or in a winter salad.
I have always loved cardamom biscuits the most
April 15, 2012 § 4 Comments

I don’t think I have ever made these biscuits the same way twice. They seem to evolve from feeling and what is in the cupboard at the time. Here is a version that is close to what I always start out wanting to make but am usually too stingy or don’t have all the ingredients at hand to pull it off. You can choose to add less almond meal and more flour if you like – the nuttiness makes them very rich.
Recipe for cardamom biscuits
100g butter
3/4 cup rapadura or brown sugar if you want
½ tsp baking powder
1 tsp cardamom
1 tsp vanilla essence
½ tsp cinnamon
¼ tsp nutmeg
zest of ½ orange
1 egg lightly beaten
1 cup almond meal
¾ cup wholemeal spelt flour sifted
Pre heat oven to 180°C. Cream together butter, rapadura and spices. Add and combine the egg and vanilla. Then stir in the flour, almond meal and baking powder until just combined. You don’t want to over stir once the flour has been added because it will stimulate the gluten and make your biscuits tough
Place spoonfuls on a greased baking tray making sure you allow room for them to spread. Cook for 15-20 minutes or until golden brown.

baked lemon cheesecake with an almond and hazelnut base
September 28, 2011 § 7 Comments

I think simple is best when it comes to cheesecake. Therefore, not much of an introduction needed, except to say I adapted it from here, avoided all the electrical equipment that makes me dread washing up, filled it with lemon rind and changed the base.
For the base
80 g plain biscuits (plain wafers and arnotts variations work well)
1 1/4 cups mix almonds and hazelnuts
150 g non salted butter

Toast the nuts and crush in a mortar and pestle along with the biscuits. Melt the butter and mix with the nuts and biscuits. Push into a lined and greased 22 cm base springform cake tin. Allow to chill in the fridge for half an hour and in the meantime…
… the filling
500 g cream cheese
300 g sour cream
3/4 cup castor sugar
4 smallish to medium eggs
3 tsp vanilla essence
Rind from 1 1/2 lemons

Note, pull the cream cheese and sour cream out of the fridge a couple of hours early to help it soften.
Preheat the oven to 160°C/320°F. Cream together the cream cheese, sour cream, and sugar. Add the eggs, vanilla essence and lemon rind and beat with a hand-mixer until smooth and creamy. Pour onto the base and bake for an hour or until set all the way through. Chill in the fridge et voilà.

Parfaite!! Well except for the little crack. But thats a sure way to tell its homemade.
I can’t help imagining what it might taste like with rosemary, or maybe lavender (not so simple after all)… does that make me strange?
sauerkraut
July 29, 2011 § 1 Comment

The fermentation of cabbage is a very ancient chinese tradition that is believed to have come to Europe with the nomadic Tartars. So whilst we usually associate Sauerkraut with Germany, it is really only the name that bares its origin there. The French on the other hand call it ‘choukrout’.
Interestingly the fermentation of sauerkraut takes place with 3 different microorganisms in different successional stages of the process determined by increasing acidity. However when making sauerkraut you don’t have to worry about this, the microorganisms will take care of themselves wonderfully. What you will have to do is very very simple.
I find it so satisfying and a little bit magical harnessing the bacteria from the air to transform food. As you will probably come to know, fermentation is one of my most favourite things. On this matter, sauerkraut is a very good place to start, as it is really very very easy.

This recipe comes from Sally Fallon’s book Nourishing Traditions.
1 medium organic cabbage, cored and shredded (use half red and half green and end up with a beautiful pink sauerkraut)
1 Tbsp sea salt
4 Tbsp whey (alternatively use an additional 1 Tbsp salt)
Shred the cabbage and combine in a bowl with the salt and whey.

Pound with a wooden pounder, or anything similar you can get your hands on. I usually use a metal potato masher. Keep this up for about ten minutes to release the juices.
Place in a large wide mouthed and steralised glass jar. Press down firmly with pounder or potato masher until the juices rise above the cabbage. The top of the cabbage should be at least 1 inch bellow the jars mouth. Cover tightly and leave at room temperature for approximately 3 days before transferring to the fridge. It is then ready to but will improve with age.

Preserving Olives
June 13, 2011 § 11 Comments

We live in one of the old Greek and Italian neighbourhoods of Melbourne. One of those suburbs that every now and again sport concrete lawns dotted with olive and lemon trees. A very particular aesthetic that I myself am not particularly partial to but nevertheless, I appreciate the mini suburban farms even though embedded in a cement landscape of which I can only imagine is a good way of keeping out the weeds. I am lucky enough to enjoy the advice of an old greek man who sometimes happens by when I’m in the front yard. He leans over the fence, a subtle aroma of cigarettes, commenting on the progress of our orange tree and the vegies in the garden. I enjoy the aged and wisened advice, it is the stuff I cherish most.
So it is at this time of year that trees are heavy with black fruit and the markets and grocers are brimming with plump and round olives.


I have never pickled olives before, and from a little research, have learned there is more than one way of going about it. Jim Massoto gives a wonderful step by step set of instructions and advice which you can find here. However his process takes 20 days in which you soak the olives in briny water that you change every day.
We decided, to go for a rather simpler option that a friend let us in on after he was given the advice from an olive seller at Preston Markets. With this method you may end up with olives that are slightly more bitter, but after tasting our friends and considering this process was much nicer on the environment as less salt would be poured down the drains, we were convinced. Also, it’s no where near as much hassle.
How to preserve olives
First, you want to make sure you pickle your olives when they are as fresh as you can get them as they are quick to spoil. Pick out any bruised or spoiled olives as they have an off flavour.
Sterilize a bunch of big jars. Wash the olives thoroughly and place in the jars. Cover with briny water (100 g salt dissolved per 1 litre water). Then pour a layer of olive oil on the top of the water and seal tightly. The fuller the better, as the less air inside the jar, the less likely they will contaminate. Leave in a dark cool place for about 3 – 4 months or until they develop a rich olive flavour. A layer of scum will develop at the top of the jar, however this is said to be helpful in taking away the bitterness of the olives.


And we wait, fingers crossed.
Labna and Whey
May 27, 2011 § 3 Comments
Traditionally eaten in Lebanon, Palestine, Syria and Jordan labna is a wonderful and easy way to make your own soft white cheese. Labna is creamy and delicious and works equally well with savory or sweet things. For example, spread it on toast with honey or alternatively garlic, olive oil and tomato. Eat it with stewed fruit or next to curries and so on.
To make Labna, you need to separate the whey from yoghurt. You are then left with a beautiful soft cheese and whey.
Whey is incredibly nutritious. Sally Fallon notes in her book, Nourishing Traditions, that whey has been used to cure a variety of human ailments since the time of the ancient Greeks. It is full of minerals and one teaspoon taken in a glass of water is said to help digestion. It is also said to help keep your joints, muscles and ligaments young and movable.
So to separate your whey from your yoghurt, you will need to place your yoghurt in a muslin cloth.

And suspend over a bowl either in a sieve or hanging from a wooden spoon and leave in a cool place for 24 hours.
 You should then be left with a good layer of whey in the bottom of your bowl and lovely soft white cheese. Store your whey in a glass jar in the fridge.

To store your labna you can roll it into balls and cover with olive oil (obviously not if you want to use it for something sweet).

homemade fig and pear semi-freddo
April 3, 2011 § 13 Comments

Over our back fence there is an overgrown lane-way. The grass is knee-high littered with old televisions and garden clippings sneakily dropped out of neighbours lives. This place seems long forgotten. Certainly no one seems to go there. And I wouldn’t either, if it were not for the huge fig tree that hangs beyond one lucky neighbours back-yard, the branches reaching deep into the lane. Once a week I have been jumping our fence, braving the long grass with the hidden electrical appliances and checking on the figs, waiting for them to turn soft and blushing purple. I’m glad I have been watching so closely, because all of a sudden they have hurriedly begun to ripen and split, the purple blush revealing delicious pink softly wrapped in white. My recent visits have had me returning with a wide sticky smile and pockets juicy and bulging. I have needed careful restraint in order for them to make it all the way to the kitchen with me. Luckily the idea of fig ice-cream has kept me determined to save a special few.
Semi-freddo is a lovely way to get the idea of ice-cream without all the bother, fluster and equipment needed to produce it. Inspired by Jamie Oliver’s recipe in this book I have changed the quantities a bit, and adapted it to my own flavourings.
It’s probably obvious, I am making fig and pear semi-freddo because I want to impress someone. What could be especially delightful for my sweetheart just back from 5 months in Africa. This recipe is both seductive and gentle with the comfort of pears and flirtation of figs.
What you will need
400 g fresh figs
1 ripe pear
2 Tbsp fresh lemon or lime juice
pinch cinnamon
100 g brown sugar
1 vanilla pod
1 tsp pure vanilla extract
5 free range organic eggs separated
600 ml thick organic cream
pinch salt
1 Tbsp raw organic honey

Remove the stalk from the fig and cut into quarters. Remove the core from the pear and roughly chop. Place the fig, pear, lemon juice, cinnamon and sugar in a saucepan and stew until soft and caramelised. Allow to cool before pureeing.
Whisk together the egg yolks and vanilla.
In a second bowl whisk the cream until soft peaks form.
In a third bowl whisk the egg whites and salt until very firm peaks form.
Gently fold all ingredients together. Transfer to an old ice cream container or tupperware and drizzle with honey before placing in the freezer for about 4 hours or until partially frozen. Otherwise, freeze for longer and place in the fridge for 20 minutes before serving. Semi-freddo is Italian and literally translates to semi-frozen.
Serve in a bowl with fresh figs or a drizzle of honey.

Enjoy!
Other very tasty combinations:
Banana and cardamom
Apricot and almond
Chocolate and chili
Autumn and Chutney Red and Green
March 18, 2011 § 2 Comments

The days are whirling on by. Why is there such a fine balance between being too busy and not busy enough. I have hit too busy hard and have resorted to that all to familiar feeling that any tiny spare moment in the day must be made productive. At the same time I am trying preciously to hold onto stolen moments alone in the garden, or a walk down a quite evening street, or a good stare at the ceiling whilst lying in bed. A life without time to smell winter on its way, or missing the precise day autumn turns the leaves on the trees, or not noticing the loveliness of a miserable cold day, isn’t worth living to me.
So Autumn has snuck up and run me over. It comes with cold toes and dewy grass, turmeric days, darkening evenings, soup cravings and way too many tomatoes in the garden.
This Tomato Chutney recipe originated from a friends brother. Its evolved a bit along the way but was so damn good to start with that it would be a shame to change it too much. The recipe calls for green tomatoes but because ours are still ripening I have used red ones instead and just used a bit less salt. If you are using red ones you also don’t need to let the tomatoes sit over night in the salt as the recipe suggests.
2 kg tomatoes roughly chopped
700 g onion finely diced
700 g grated apple
1/3 of a cup salt (if using red tomatoes 1/4 cup will do)
2 cups dark brown sugar
400 g sultanas or raisins
400 g dates roughly chopped
2 and 1/2 cups apple cider vinegar
1 Tbsp turmeric
1/2 Tbsp curry powder
1 Tbsp whole cummin seeds
1 Tbsp whole coriander seeds
Pinch cayenne pepper
1 tsp mustard seeds
/2 Tbsp grated fresh ginger
1/4 tsp chilli powder
1 Tbsp whole cloves
1 Tbsp whole pepper corns
Put the tomatoes, onion and salt together in a bowl and leave to rest overnight (this is only necessary if you are using green tomatoes).
Place all ingredients in a large saucepan and bring to the boil for a couple of minutes. Simmer and stir regularly for 45 minutes.
In the meantime pre heat the oven to 140°C. Clean about 10 jars in hot water. Place the jars on their sides in the oven until they have dried. Boil the lids in a saucepan of hot water.
Pour the mixture, it must be still boiling hot, into the hot jars and tighten the lids immediately.

Homemade Spicy Wedges with Aioli
February 26, 2011 § 3 Comments

I have had quite a few requests for this recipe, firstly at Friendly Beaches and then at our wonderful garden gig we had for the Luscombe street Community Garden last sunday.
To make these wedges you have to be prepared to go a bit wild in the spice cupboard. They are usually different every time I make them. This is probably depending on which spices aren’t too far back and hard to reach in the cupboard, but I will do my best to give you something to follow. I would also like to stress here that there is definitely room for personal touch. Sometimes I have made them with lemongrass, sometimes not, sometimes with cumin, sometimes not, sometimes with turmeric, sometimes not, sometimes with garam masala, sometimes not and so on. However, I think the lemon juice, zest and cinnamon are great ingredients to add an intriguing flavour.
I have provided an aioli recipe to go with the wedges but they are just as good with chutney or the like.
Spicy Wedges (Serves 4 – 5)
2 kg potatoes
2 tsp cinnamon
1 tsp paprika
2 tsp whole cumin seeds
2 tsp ground coriander seeds
1/2 tsp chilli flakes
1 1/2 tsp salt
Zest and juice of 1/2 a lemon
80 ml oil
1 stalk lemongrass beaten with the back of a knife and chopped finely

Pre-heat the oven to 200°C. Wash the potatoes and cut into wedges. Place the potatoes and all the rest of the ingredients in a large bowl. Mix until the potatoes are coated evenly.

Place the potatoes on two large baking trays making sure all wedges are touching the tray. Bake for 1 hour if using a fan forced oven, a bit longer if not.
Aioli
2 egg yolks
1 cup light olive oil or a combination of stronger olive oil and sunflower oil
3 Tbsp lemon juice
1 tsp mustard
1 tsp lemon zest
2 cloves crushed garlic
A big handful of fresh herbs. I used parsley, oregano and thyme.
Place the egg yolks and 2 Tbsp lemon juice on a large plate and stir well with a fork. Add the olive oil very very slowly, stirring well with the fork after each drop.

Once all the olive oil has been added, stir in the remainder lemon juice, zest, garlic and mustard. Finely chop the herbs and add these too.

(If you want to cheat and buy a good quality mayonnaise and add garlic lemon juice, zest and herbs to make your aioli, I promise I won’t tell anyone. I have been guilty of this too).

Serve in a bowl alongside the wedges.

Enjoy!
