
autumn fruit
March 29, 2019 § Leave a comment
With this beautiful change of season here is a simple little recipe. Dried Persimmons filled with the nostalgia of an autumn day holding all the summer in that beautiful colour. They are a delight to pick and peel and then watch as they turn a deep brown drying in the winter sun. And its so simple. Only a little preparation and then a little waiting is required. My friend John C showed me how to do it a year ago now, and I have been waiting for the right time to share the recipe here with you.
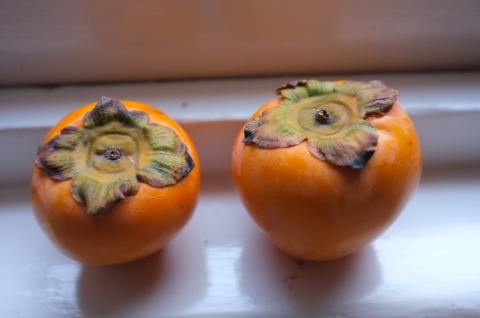
To do this, you will need a whole bunch of persimmons that are nice and golden but also still hard. You have to catch them before they go soft. This is really important.
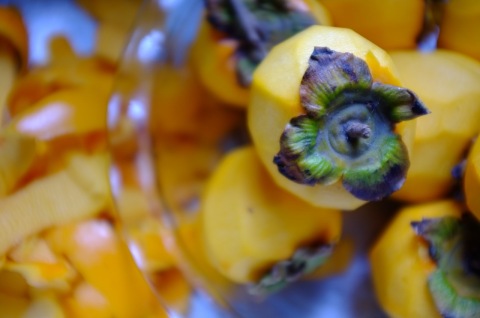
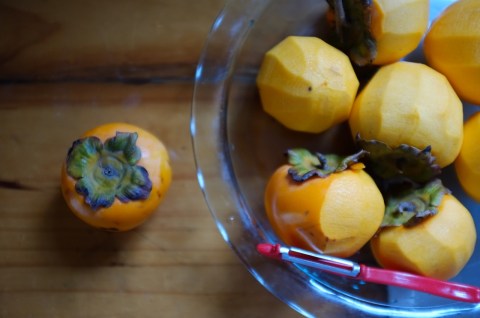
Then you simply peel, leaving the leaves and stalk. These become very useful when you are ready to tie them up and hang them in a sunny place to dry.
Then, take some string. Tie the string around the stalk or around and under the leaves.
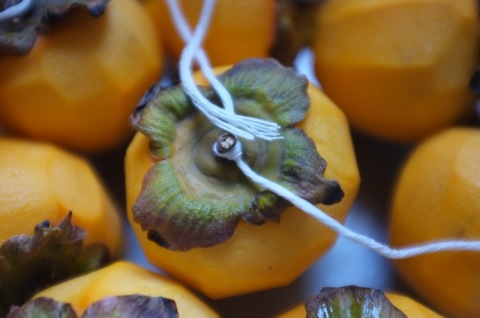
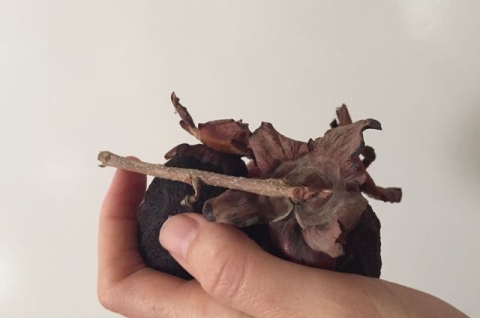
Find a sunny window to hang them in for about 2 – 3 months.
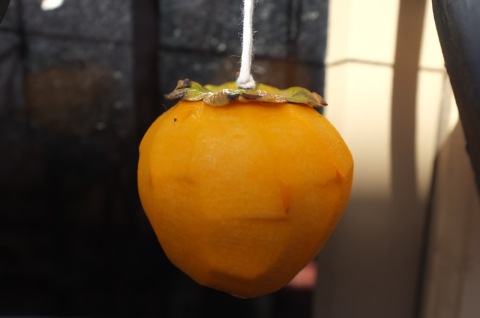
When they’re ready they will turn a beautiful deep rich brownie red.
They are delicious sliced up thinly and eaten with cheese and crackers, or in a winter salad.
late september
September 28, 2013 § 3 Comments

I had a dismal attempt at trying to grow watermelons this year. The process started with me very excited. I made a little round bed full of compost and manure and planted two little seeds inside. They sprouted and grew… A little… I watered them and they grew some more. They bloomed tiny little flowers and even grew one tiny little watermelon. Then I went away and the little watermelon shrivelled up. Then the rest of the vine shrivelled. And one day they were dead. And that was that.
The sun is relentless here. Unforgiving. I realise my mistake, I shouldn’t have put them in a place that gets all day sun, and I should definitely have mulched them more.
But still, I have been managing to eat some of the very best watermellons I ever had. The local ones are cheep and abundant at this time of year. They are a deep bright pink and so so sweet.

So I have a recipe for you today, a drink, and a very refreshing one at that. It comes out of the beautiful cookbook The New Persian Kitchen. Its a watermelon, mint, and cider vinegar tonic!
Author Notes: “Even if drinking vinegar sounds like a dare — and maybe that’s why you ordered it — it’s anything but. It’s sweet and sour and icy-cold. It vibrates and clangs with fruit and vinegar, and soothes with sweetness and mint. It is the most refreshing drink you will have this summer”. From The New Persian Kitchen

Recipe for Watermelon Mint and Cider Vinegar Tonic
Makes about 5 cups concentrate
3 cups water, plus more to serve
1/4 teaspoon sea salt
1 cup honey
6 cups coarsely chopped watermelon
1 cup tightly packed fresh mint, plus more to serve
1 cup apple cider vinegar (preferably with the mother because that is the best kind for you)
Ice cubes, cucumber, and lime to serve.

- Boil the water and salt in a medium saucepan. Add the honey and allow to dissolve before removing from the heat.
- Combine the watermelon and mint in a large bowl and stir in the hot honey water. Leave to cool to room temperature.
- Once cool, add the vinegar and allow the mixture to steep in the refrigerator for several hours or up to overnight.
- Strain the mixture and eat the watermelon chunks, if desired.
- Store the concentrate in a clean glass jar in the refrigerator for up to 1 week.
- To serve, pour 1/4 cup of the concentrate into a glass over ice and dilute with 3/4 cup water. Garnish with the watermelon, cucumber, and mint.

snake beans
July 15, 2013 § 2 Comments
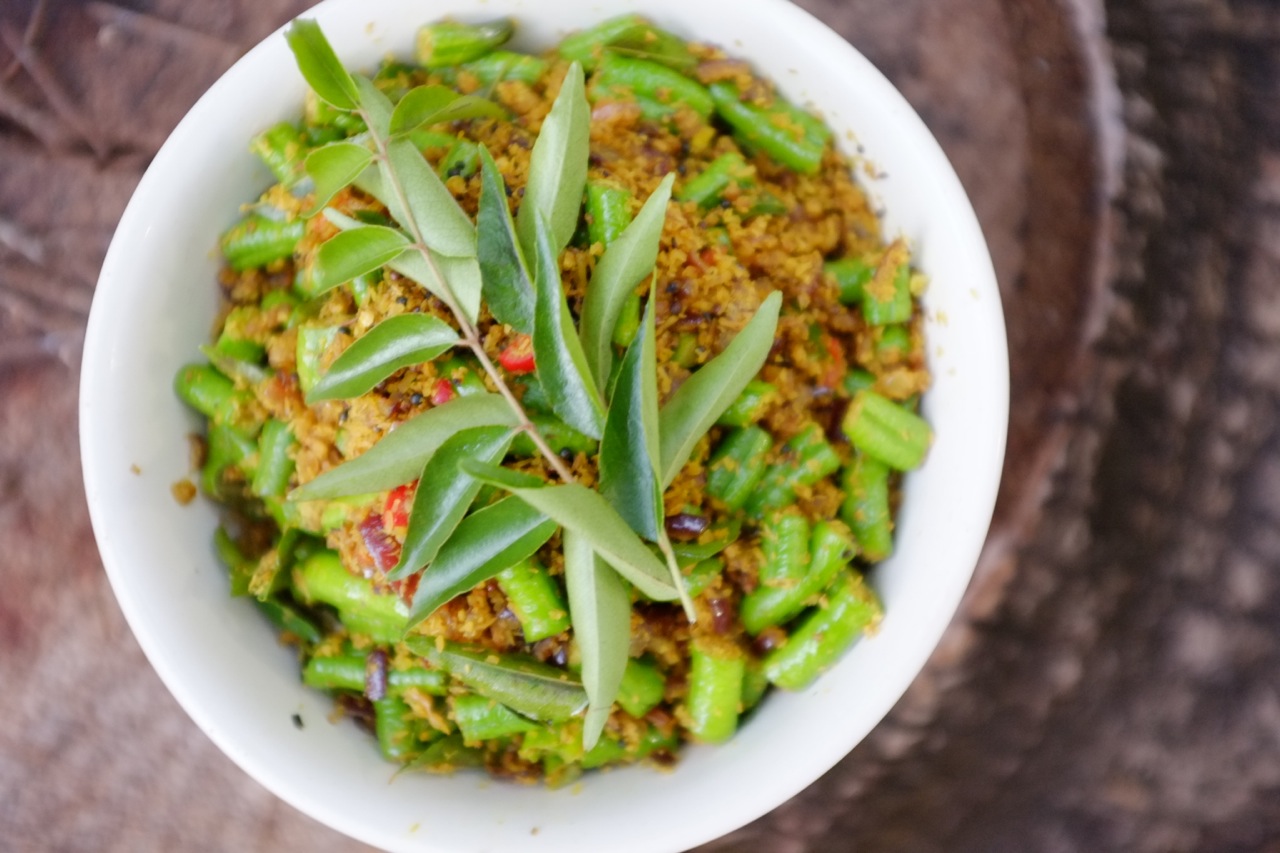
The Tropical Garden Spectacular was on a few weeks ago. At the botanical gardens under trees with impossibly huge canopies I watched some local food cooking demonstrations. Lined up on straw bales with the green grass at our feet, some glimpse of paradise on the warm breeze, the chef Selvam Kandasamy from Saffrron, taught a small group of us how to make snake beans, sautéed in spices with coconut and curry leaves. And this my dear friends is a dish to be celebrated.
Snake beans are the lanky tropical equivalent of the green bean and you would be forgiven for thinking them somewhat tough and woody with little flavour. This recipe however does them justice. It is full of flavour, crunchy, slightly sweet, bright green and turmeric yellow. The coconut and chili melts on your tongue. The intermittent curry leaves are bright in your mouth. The beans are cooked hot in a wok for just the very right amount of time making them softly crunchy and fluorescent.
I have made this recipe many times since then and each time I have continued to love it. It is similar to the original made by Selvam Kandsamy except I have used coconut oil instead of peanut oil.
Spicy Snake Beans with Coconut and Curry Leaves
Serves: 4 – 5 as a main or 6 – 8 as a side dish.
Note: If you are in distant and cooler parts wanting to use something more locally appropriate I am sure green beans would also make a good substitute.
3 Tbsp pure coconut oil
2 flat tsp brown mustard seeds
2 flat tsp turmeric
1/2 tsp salt
1 red onion finely diced
1 whole fresh red chillis (you can also use 1 tsp dried chilli flakes instead)
1 Tbsp Split yellow lentils (optional)
4 cups chopped snake beans
1/2 cup shredded coconut
A good handful fresh curry leaves
Extra salt to taste

Prepare all your ingredients before hand. Once you start cooking it all happens fast.
In a wok heat the oil on a medium to high flame until hot. Add the mustard seeds, turmeric, onion, and salt. Stir until the onions turn just translucent, then add the chilli and lentils. Continue stirring and add the beans and coconut stirring until the beans are just cooked through but still have a crunch and are bright green. Add the curry leaves and remove from heat.
It is lovely served as a side to fish or on its own with brown rice.
I hope you like it as much as I do.

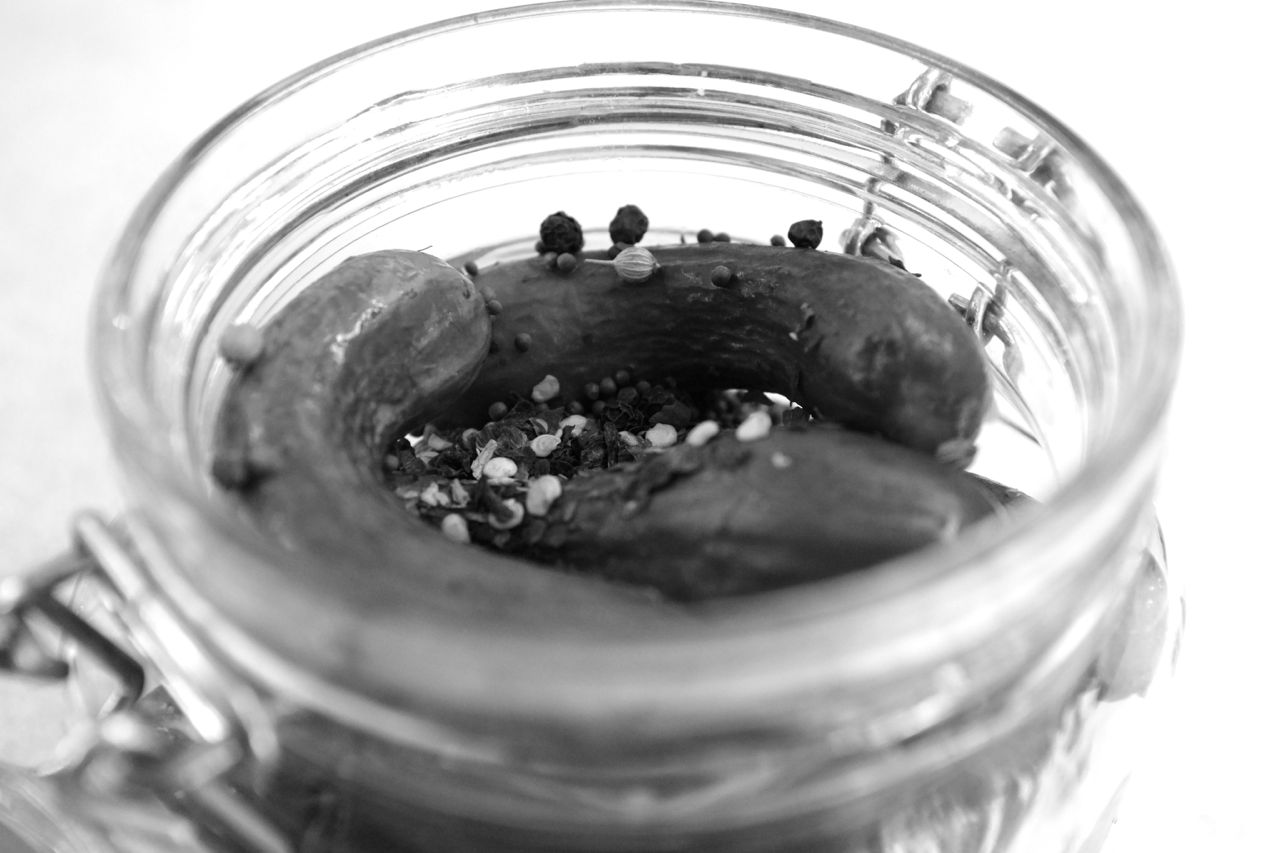
pickles
June 23, 2013 § Leave a comment

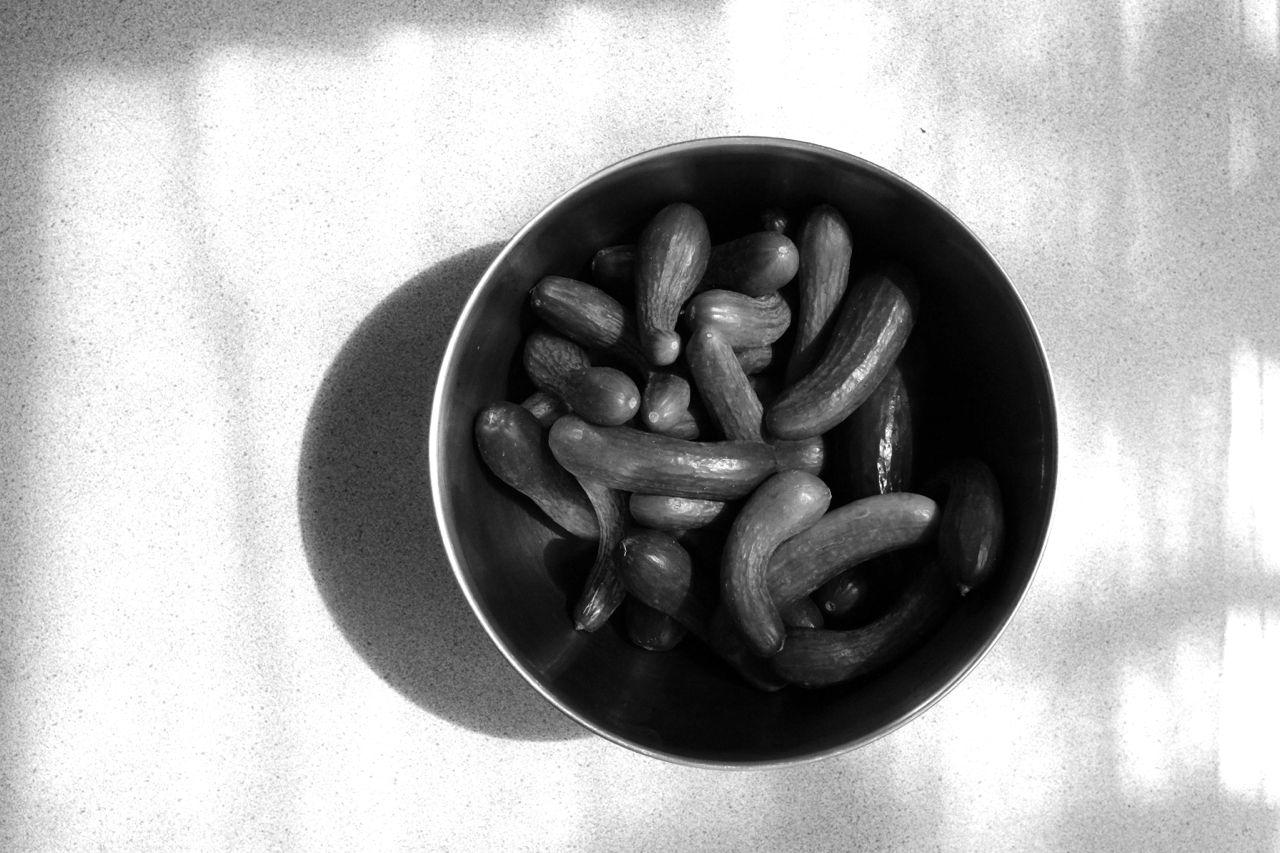
Without meaning to belabour the point, winter is an exciting time in the top end. Really it is like summer down south and the vegies that grow this time of year are proof of that. We have four cucumber plants in pots under the verandah in anticipation that they will provide some edible shade in the coming months. But in the meantime, I have been getting them from the markets, small and sweet, straight from the local growers at Humpty Doo.
And I know I have mentioned this to you before, but I do love pickles. Crunchy, tart, sour, salty. In true wholesome, traditional and healthy fashion, I have provided you with an old recipe for making pickles, one that uses ancient methods of fermentation and preservation. This way you get all those wonderful lactobacillus which I have been told, on countless occasions by my mother, – are very very good for you. And mothers are always right.
If you want a recipe for pickles that tastes like those you buy in the shops you will need to look elsewhere. Inspired by Jenny at Nourished Kitchen, this recipe uses salt rather than vinegar and as a result, the lacto fermentation process. But still, below I have given you two options for making brine. The first is exclusively with salt and the second is with less salt and a small amount of apple cider vinegar. You can decide which version you like the best.
Lacto fermented pickled cucumbers
For pickling, try to use freshly picked cucumbers if possible, but if not, get ones that are organic and as fresh and small as you can find. Say no more than 2 inches long.
Ingredients
Enough pickling cucumbers to fill your jar(s).
4 cloves of fresh organic garlic – per 500ml jar
1 tsp spices (for example, allspice, mustard seeds, bay leaf, black pepper, dried chilli flakes etc) – per 500ml jar
Optional – Use 1 fresh grape-vine leaf with the stem removed or a horseradish leaf per 500ml jar. This will help your pickles to stay crisp when the lactic acid fermentation is complete.
Brine
Option 1: 2 ½ – 3 tablespoons of salt per 4 cups of chlorine free filtered water
Option 2: 1 tablespoon of salt and 2 tablespoons apple cider vinegar for every 3 cups of chlorine free filtered water.
(1 cup of brine usually fills a 500ml jar)
Method
If you were unable to pick your cucumbers fresh, the first thing you will need to do is soak them in very cold icy water to perk them up before they ferment. Next, you’ll want to make sure all stems and flowery ends have been removed as they may give an off-flavor to the pickles. I generally cut a tiny scrape off the ends of each cucumber with a knife to be certain. It is also important that each cucumber is cleaned carefully. These steps will help ensure your pickles remain crunchy.
Place the pickling cucumbers, garlic and spices in sterilised jars in layers and ensure that they are a snug fit but without damaging the cucumbers. Add the horseradish or grape-vine leaf if you have it.
Prepare your brine. Shake or stir to help the salt fully dissolve. Pour the brine over the pickling cucumbers, until all of the ingredients are submerged. It is important that all of the ingredients are covered with the brine, and if necessary add a clean weight into the jar to help push them under the liquid, for example, a small plastic lid. Secure the lid and allow to ferment at room temperature for between 5 and 10 days, depending on your climate. The cooler it is the longer it will take. Once they are ready, store in the fridge to be eaten as you please.
As a side, I know it can be a fear with people, as it was with me, to be uncertain about whether your ferments are off. All I can say is, trust me, you will know. The smell is bad enough that you won’t want to touch them.
spiced roast eggplant and zucchini salad
January 13, 2013 § 1 Comment

It is hot! Stinking hot! The kind of heat with thick hairdryer winds. The kind of heat you feel like you are swimming in rather than walking in. The air is viscous, your arms almost float in it.
I never feel like eating much in this weather other than ice cubes, salads and smoothies. Not all at once of course but spaced between episodes of gasping on the couch with a wet towel on my head and the fan on high no less than two feet from my face.

The recipe below for an eggplant and zucchini salad spiced with paprika, cumin and mint, is both light and rich. The dried figs, walnuts and fetta add a lovely texture to the softness of the roasted vegies.
Spiced roast eggplant and zucchini salad
2 – 3 large eggplants
1 large or 2 small zucchinis
Salt
1/3 cup olive oil
2 Tbsp apple cider vinegar
1 Tbsp honey
1 tsp paprika
1/2 tsp cumin
4 cloves garlic chopped
Zest and juice of 1 lemon
Juice of half an orange
1/2 Tbs tamari or soy sauce
1 cup fresh mint leaves roughly chopped
1/2 cup dried figs roughly chopped
3/4 cup toasted walnuts roughly chopped
1 cup roughly chopped crumbled fetta


Preparation
Preheat oven to 200°C /400°F
Cut the eggplant and zucchini into 1-inch cubes and put in a large bowl. Sprinkle lightly with salt and set aside for about 15 minutes or until juices start to come out of the eggplant. Rinse in cold water, drain and pat dry.
In the meantime, combine olive oil, vinegar, honey, paprika, cumin, lemon zest, half the lemon juice and chopped garlic. Stir into the salted and washed eggplant and zucchini.
Spread the mixture onto a large baking paper lined baking dish and roast in the preheated oven for 45 minutes, or until very tender and browned. You will need to check on them and give them a toss halfway through the cooking. Remove from the oven and allow to cool slightly.
Place roasted veggies in bowl and add tamari, orange juice and the last half of the lemon juice. Toss. Stir in the mint, figs, walnuts and feta and enjoy.
Serves 4

kimchi
September 30, 2012 § 2 Comments
Here is a vegetarian version of kimchi, a korean type of sauerkraut. I have had a craving for this for a while now, so yesterday I headed on down to the CERES market to pick up the ingredients .

What you will need
6 cups shredded cabbage
2 cups grated carrot
2 cups grated daikon radish
1 Tbsp grated ginger
2 cloves crushed garlic
1/2 – 1 tsp chilli flakes or chilli paste
1 Tbsp Salt
4 Tbsp Tbsp whey (or alternatively use an extra 1 Tbsp salt)

Place all ingredients in a very large ceramic or glass bowl. Pound with a heavy spoon, potato masher, or a meat hammer to release the juices. Sterilise, a wide mouthed 2 liter jar. Place the pounded ingredients inside the jar and push down firmly so there is a layer of juices above the vegetables. There should be at least 1 inch between the top of the jar and the vegetables. Cover tightly and leave at room temperature for 3 days before transferring to the fridge. You can eat straight away, however it will improve after another week or so.

quinoa pancakes
July 8, 2012 § 7 Comments

I have been eating a lot of these lately, drizzled with maple syrup, fresh grated pear and creamy yoghurt. Its a lovely way to start these cold days. Pretty healthy too given that they are gluten free and full of protein. Instead of using buckwheat flour you can add double the amount of almond meal or vice versa. Up to you!

Recipe for quinoa pancakes
3/4 cup quinoa
1 1/4 cups water
2 eggs
1/4 cup almond meal
1/4 cup buckwheat flour
1/2 cup additional water
1 tsp baking powder
First you will need to cook the quinoa: Rinse and drain the quinoa and then place in a saucepan along with 1 1/4 cups water. Bring to the boil and then reduce to a simmer until all the water is absorbed and the grains are soft, much like you would cook rice.
Allow to cool before adding all the remaining ingredients including the additional water. Beat with a fork or whisk until you have a fluffy and well combined batter.
Cook as you would any pancakes in a heavy based greased frying pan, over a medium flame and tilting once you have added the batter to help it spread a little. Cook until golden brown on both sides.

Have a lovely day…
xx
